
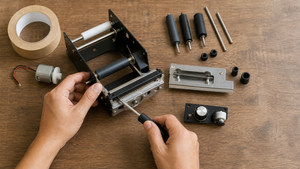

Cutting tape by hand during a busy packing shift is repetitive and uneven—pulling against a blade over and over produces strips that rarely match. An automatic tape dispenser changes that rhythm. It feeds a preset length, wets the adhesive if needed, and cuts without the operator ever touching a serrated edge. Building one yourself means you control the feed speed, the length accuracy, and whether it handles gummed paper tape or slippery films like Kapton.
This project isn't a plug-and-play appliance. It's a collection of rollers, a motor, a blade, and a length controller wired into a frame. The sources describe how commercial models manage these steps, and we'll use those descriptions to shape a workable DIY version. If you're tired of hand cramps and scrap ends, the assembly effort may pay off quickly.
Before You Start: How an Automatic Tape Dispenser Works
An automatic tape dispenser follows a simple, repeatable sequence: a drive motor pushes tape between feed rollers, the machine pulls the tape forward to a preset length, wets it if the tape is gummed, and then a blade slices it without manual force. In a manual dispenser, the operator yanks the tape and drags it against a stationary blade—that's where fatigue and length variation creep in. The automatic version replaces muscle with motorized feed and electronic control.
According to descriptions from amesonpak.com, the core components include feed rollers that grip and advance the tape, a wetting roller that activates starch adhesive (when building for water-activated tape), a cutting blade, and a control mechanism for setting repeatable lengths. Better Packages notes that electric dispensers often run on 115 V, 220 V, or 100 V inputs, depending on the region. For a DIY build, this means you'll need to match your motor and power supply to the local standard—no one-size-fits-all.
A hand-held tape gun asks a lot of the wrist. An SGS Independent Research Study, referenced in industry discussions, links repetitive manual dispensing to fatigue and inconsistent tape lengths. Better Packages further cites a potential carpal tunnel risk from prolonged use, though that's a source-reported association, not a guaranteed outcome. Moving to an automatic setup removes the pulling motion altogether, which changes the physical demands of packaging work.
Parts and Prerequisites for the DIY Build
You don't need a pre-made kit. The source mechanisms suggest a few core items: a drive motor or actuator with enough torque to overcome tape roll inertia, a pair of feed rollers (one driven, one idler), a sharp blade mounted safely behind a guard, and a length-control circuit—a simple timer or encoder-based preset. If you're handling gummed paper tape, add a wetting roller and a small water reservoir; starch adhesive needs moisture to activate, and the roller must dampen the tape without dissolving the fiberglass reinforced strands that give it strength.
A post on HomemadeTools.net highlights two practical considerations for builders: adjustability and material sensitivity. Preset length needs to be tweakable, not fixed, because different box sizes demand different tape lengths. The same source mentions that Kapton tape—a polyimide film often used in electronics assembly—is particularly difficult to cut cleanly by hand. If your goal is to dispense Kapton, plan for a blade angle and feed tension that can handle a slippery, thin material without tearing.
When does an automatic feed justify the extra assembly time? Ameson Pak contrasts manual and automatic models: the manual version is simpler and costs less up front, but every pull is a chance for a crooked cut or a sore forearm. In a high-volume setting, or when tape length uniformity matters for carton presentation, the automatic approach saves effort. For the occasional box, a hand dispenser might still be enough.
Step-by-Step Assembly
Start with a rigid frame—aluminum extrusion or plywood works—and mount the feed rollers so the tape path runs straight from the roll spindle to the cutting point. The driven roller should contact the tape adhesive side (or backing, depending on your preference) and press firmly against the idler roller. A spring-loaded idler can compensate for slight thickness changes. Wire the motor to your length control: a microcontroller counting encoder pulses or a simple 555 timer circuit that powers the motor for a defined duration. Add a limit switch or optical sensor if you want feedback-based stopping.
For the cutting action, avoid any design that requires the operator to pull the tape against a blade. Instead, mount the blade on a small solenoid or stepper-driven slide that fires after the preset length has fed out. The blade should retract immediately. If you're building for gummed tape, position a wetting roller between the feed rollers and the blade. Keep the water wick or drip system gentle—starch adhesive can turn gummy if over-wetted, and the amesonpak.com source describes fiberglass strands inside the tape that shouldn't be abraded by a rough roller surface.
Calibration is a builder verification step, not a lab test. Use corrugated boxes of the size you seal most often. Run the dispenser ten times, measure the strips, and adjust the preset until the mean length lands within a tolerance you find acceptable. If you'll dispense Kapton tape for printed circuit board masking, try a few strips on a scrap board to check that the feed doesn't wrinkle the tape. The HomemadeTools.net discussion notes that feed consistency—not ultimate precision—is what builders chase.
Mistakes That Lead to Inconsistent Tape or Jams
When a DIY dispenser starts eating tape or spitting out uneven pieces, a few assembly errors are usually to blame. The sources flag pulling against a stationary blade as a trouble spot; if your automated design still requires a tiny tug, that reintroduces the same length variability as a manual dispenser. Uneven feed often traces back to misaligned rollers or a loose idler tension. A roller that grips harder on one edge will skew the tape and cause jams or wrinkled edges.
Voltage selection can be a sneaky culprit. A motor rated for 220 V running on 115 V will turn sluggishly, making the controller's preset length meaningless. Conversely, feeding 220 V to a 100 V motor will over-speed it and possibly overheat. Better Packages' source notes the three common voltage inputs—115 V, 220 V, 100 V—and your build must match the power supply to the motor's specification. Even small mismatches in roller spacing, a gap a fraction of a millimeter wider on one side, can steadily drift the tape and produce strips that vary cut after cut.
Noise during extended use, a complaint mentioned in the Better Packages source, often arises from a direct-drive motor vibrating against the frame. Rubber grommets or a soft mount can reduce that, but don't expect absolute silence. A whirring sound is normal; a grinding sound suggests a bearing or blade alignment problem.
Troubleshooting Common Build Problems
Tape length varies? Check the preset length calibration first. If you're using a timer-based control, slight motor speed fluctuations from temperature or load will affect the result. An encoder feedback loop cures that drift, but if you've already built one and the lengths have suddenly gone ragged, look for roller slippage. A worn idler roller surface or a loose spring can let the tape slip during the feed cycle, so the controller thinks it's dispensing 6 inches, but only 5.5 inches actually moved.
Blade issues show up as torn edges or the tape refusing to release cleanly. The angle of attack matters. Ameson Pak's description of manual dispensers highlights that the operator pulls against a blade; in an automatic design, the blade should move into the tape path perpendicularly. If the tape is still tearing, slightly dull the blade back to a scissor-like shear instead of a razor edge—too sharp a blade can snag and rip thin films. Also examine the tape path: if the tape wanders before reaching the blade, it'll catch on one corner.
Noise from the drive mechanism during long runs can be more than an annoyance. If you hear a rhythmic click or knock, inspect the motor coupling. A misaligned shaft between motor and roller will transmit vibrations that amplify under sustained use. Adding a flexible coupler or adjusting the frame mount often quiets it. The HomemadeTools.net source suggests that builders sometimes overlook this joint until after the first hour of operation.
Everyday Use with Cartons and Specialty Tapes
Once the dispenser runs reliably, it becomes a station for repetitive packaging tasks: sealing corrugated boxes for shipment, or feeding Kapton tape during board assembly. These two applications stress the machine in different ways, so a few use-specific adjustments help.
Cutting Kapton Tape Without Manual Pulling
The HomemadeTools source notes Kapton tape is notoriously frustrating to cut by hand—it's thin, slippery, and tends to wrinkle when pulled against a fixed blade. An automatic dispenser sidesteps that by advancing the tape under controlled tension and cutting without yanking. Test your preset length and blade position on a roll of Kapton before committing to a full production run. A too-aggressive feed can stretch the tape, while a dull blade angle may leave a fuzzy edge that doesn't sit flat on a PCB.
If the tape still curls at the cut, try reducing the unwind tension on the roll spindle. Kapton rolls are lightweight; too much drag from the spindle brake can cause the tape to spring back after the cut. The source's observation about handling difficulty is a good reminder: the material rewards gentle, consistent feed and a blade that shears rather than chops.
Using the Dispenser with Corrugated Cartons
When you're sealing cartons, quantity matters. Our cartons-B2B collection gives you a ready supply of corrugated boxes for testing and daily use. The amesonpak.com source lists corrugated box sealing as a primary application for automatic tape dispensers. With your DIY build, run a few sample seals to confirm that the tape length covers the box flaps with enough overhang (usually 2-3 inches per side).
For gummed tape, the wetting roller must activate the starch adhesive completely. A dry strip won't bond, and an over-wet one takes too long to dry and can wrinkle the carton surface. During calibration, check a sealed carton after 30 minutes; the tape should lie flat and resist peeling. The build won't match a commercial dispenser's throughput, but for a small packing operation, it can eliminate the inconsistency of manual cutting and keep your hands out of the repetitive pull-and-tear cycle.
